Mastodon

K L Contractor Plumbing Inc

Water Heater Leak Emergency: How to Shut Off Your Water Heater in the First 15 Minutes

A leaking water heater is not a minor inconvenience. This type of plumbing emergency requires immediate action to protect your property from extensive damage, structural issues, and potential safety hazards. Whether you wake up to a puddle beneath your tank or discover moisture streaming across your basement floor, the first 15 minutes of your response can make the difference between a manageable situation and a catastrophic disaster.

K L Contractor Plumbing Inc has responded to countless heater emergencies across Marietta and Metro Atlanta over our 26 years in business. We understand the panic homeowners feel when they discover a burst or active leak. This guide provides the exact steps you need to take during those critical first minutes while waiting for professional help to arrive.

Recognize the Signs of a Heater Emergency

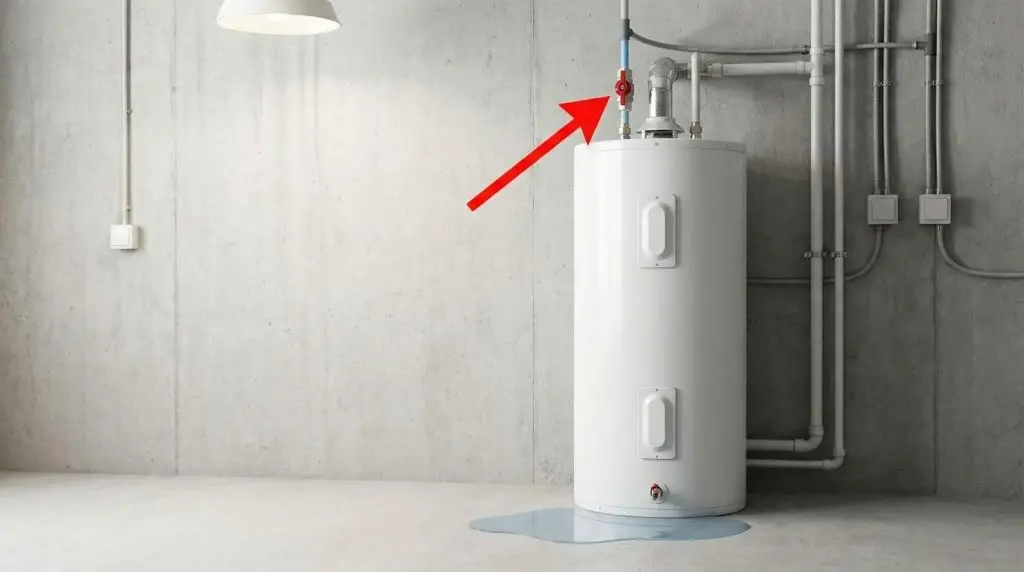
Not every drip qualifies as an emergency, but certain signs indicate you need to act immediately. Understanding the difference helps you respond appropriately.

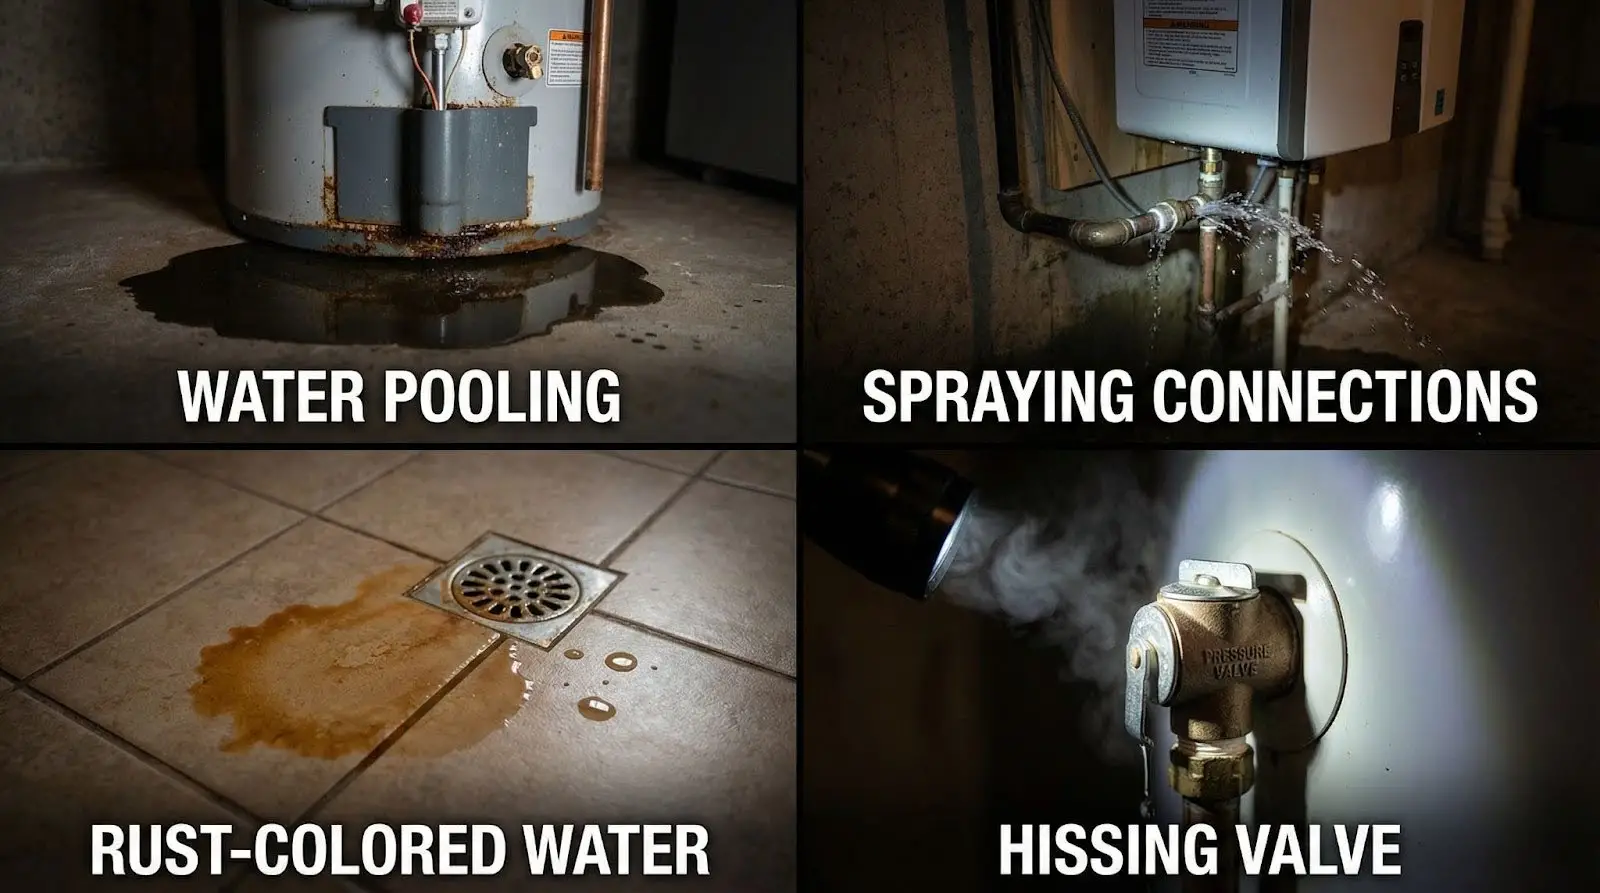
Immediate emergency indicators include:

  • Standing moisture pooling around the base of your unit
  • Liquid actively spraying or streaming from the tank or connections
  • Rust-colored discharge flooding from the unit
  • Hissing sounds combined with visible moisture
  • Damage spreading to nearby walls, flooring, or belongings
  • Electrical components exposed to moisture

A small amount of condensation or occasional dripping from the pressure relief valve may not constitute an emergency. However, any continuous water leak from connections or fittings demands urgent attention.

If you notice liquid actively flowing from your unit, treat this as a plumbing emergency that requires you to act fast.

Step 1: Shut Off the Water Supply Immediately

Your first priority when discovering a heater leak is stopping the flow. Every minute liquid continues running through your system means more potential property damage.

Locate the cold inlet shut-off valve. This valve sits on the cold inlet pipe at the top of your unit. Turn it clockwise to close completely.

For gate valves with a round handle, turn the handle several full rotations until it stops. For ball valves with a lever handle, rotate the lever 90 degrees so it sits perpendicular to the pipe.

If you cannot reach the area safely:

  • Go to your main shut-off valve instead
  • This valve is typically located where the main line enters your property
  • Turn off all supply to the house until help arrives

Do not attempt to wade through standing liquid to reach the shut-off valve, especially if the area contains electrical outlets, appliances, or exposed wiring.

Step 2: Turn Off the Power Source

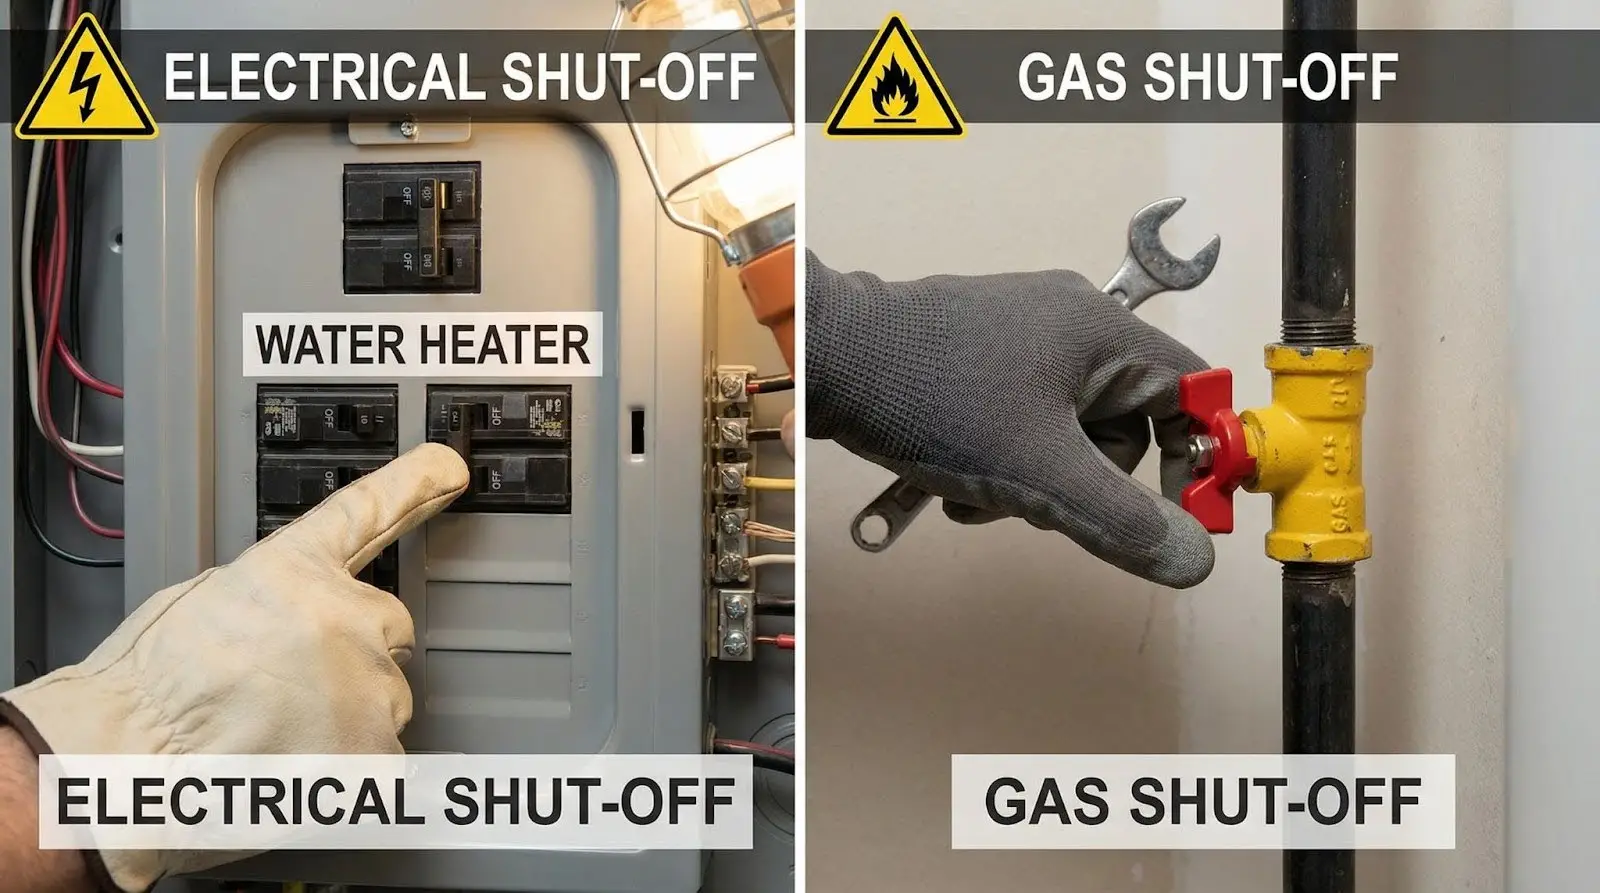
Once you have addressed the supply, immediately cut power. This step prevents electrical shock hazards, gas leaks, and further damage to heating elements.

For electric units:

  • Locate your electrical panel
  • Find the breaker labeled for the heater
  • Flip the breaker to the OFF position
  • If breakers are not labeled, turn off the main breaker as a precaution

For gas units:

  • Locate the gas shut-off valve on the supply line
  • Turn the valve to the OFF position (perpendicular to the pipe)
  • If you smell gas, leave immediately and contact your gas company

Never attempt to address gas lines yourself. Gas leaks combined with heater malfunctions create dangerous conditions that only licensed professionals should handle.

Step 3: Inspect the Source of the Leak

With supply and power safely off, you can take a moment to assess the situation. This information helps technicians understand the problem before they arrive.

Common leak locations to check:

  • Tank bottom: Indicates internal corrosion or structural failure
  • Temperature and pressure relief valve: May signal excessive pressure or a faulty valve
  • Inlet and outlet connections: Could indicate loose fittings or corrosion
  • Drain valve: Often caused by a damaged or loose valve
  • Tank seams: Suggests structural failure requiring replacement

Do not attempt to tighten connections or address any components while the system remains pressurized or hot. Simply observe and document what you see.

Take photos with your phone if safely possible. These images help professionals diagnose the issue and prepare appropriate materials before arriving.

Step 4: Drain the Tank If Possible

Draining remaining liquid from your tank reduces continued leaking and minimizes potential damage. This step works best when you can safely access the drain valve.
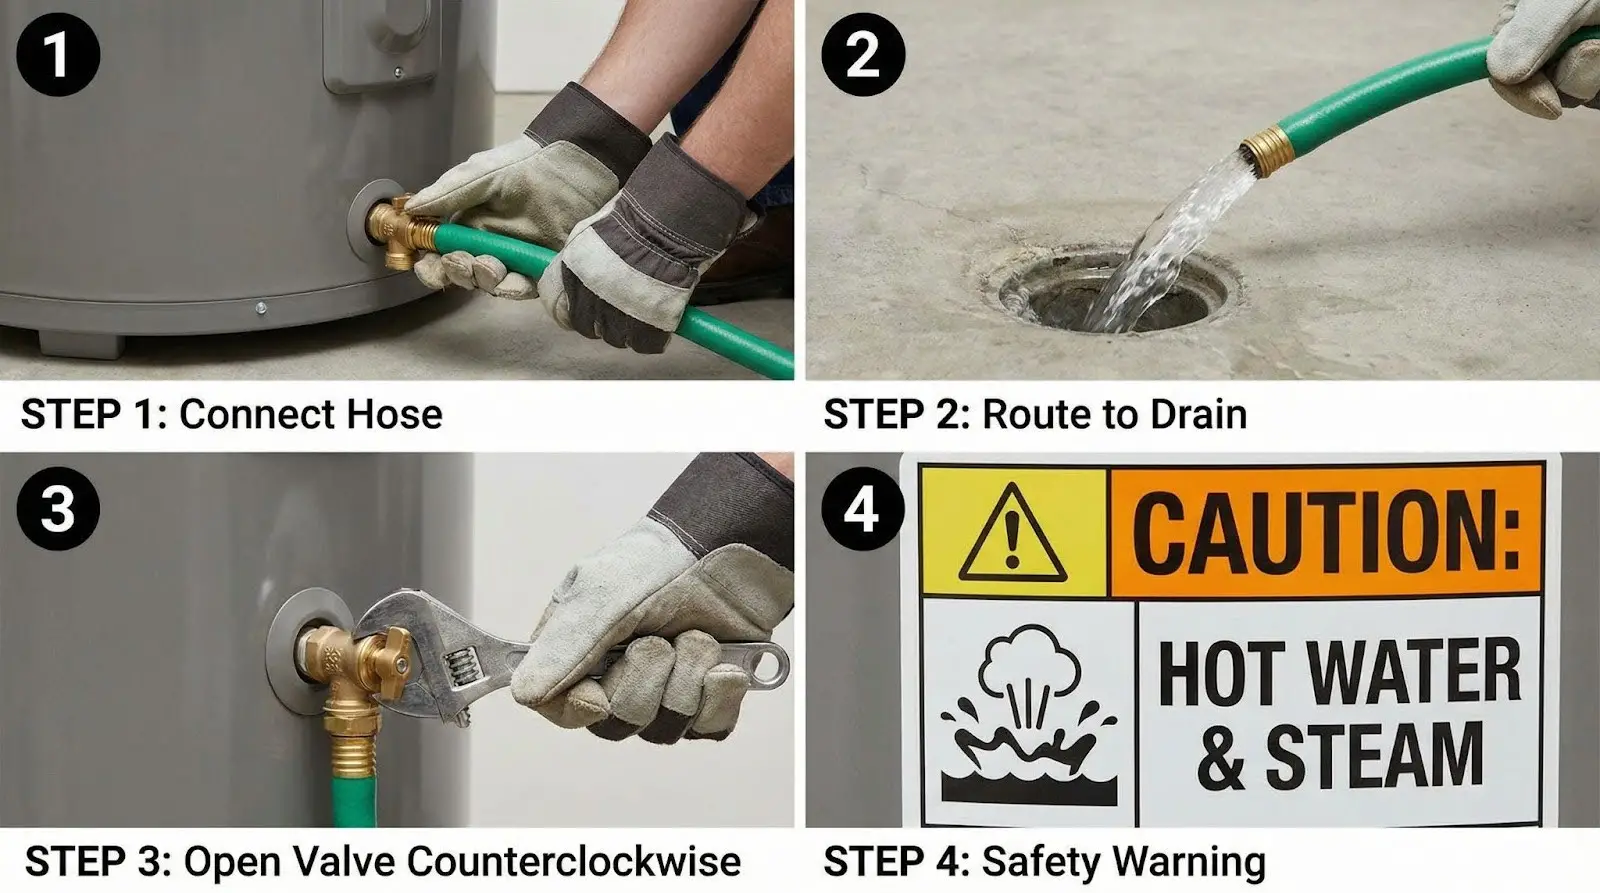
To drain your unit:

  1. Connect a garden hose to the drain valve near the bottom
  2. Run the hose to a floor drain, outside, or into large buckets
  3. Open the drain valve by turning it counterclockwise
  4. Allow liquid to flow out gradually

Remember that contents inside your tank are hot. Use caution to avoid burns, and keep children and pets away from the drainage area.

If the drain valve appears damaged or the leak originates from the tank bottom, draining may not be effective. In these cases, focus on containing the spread rather than emptying the tank.

Step 5: Contain and Minimize Damage

While waiting for emergency services, take steps to limit damage throughout your property. Quick action here protects your flooring, walls, and belongings.

Immediate containment measures:

  • Place towels, blankets, or tarps around the unit to absorb spreading moisture
  • Use a wet/dry vacuum to remove standing liquid if available
  • Move furniture, boxes, and valuables away from the affected area
  • Place plastic sheeting under items that cannot be moved

If moisture has reached carpeted areas, pull up carpet edges to promote drying and prevent mold growth. Position fans to circulate air across wet surfaces.

Document all damage with photographs for potential insurance claims. Your homeowner’s insurance may cover failures and resulting damage.

Step 6: Contact Professional Services Right Away

A leaking water heater should be treated as an urgent situation requiring professional right away. While DIY troubleshooting helps minimize damage, only licensed technicians should diagnose and address these issues.

When you call for emergency service, provide:

  • Your location and contact information
  • Type of unit (gas or electric, tank or tankless)
  • Location and severity of the leak
  • Whether you successfully shut off supply and power
  • Any sounds, smells, or visible damage

K L Contractor Plumbing Inc offers 24/7 emergency services throughout Marietta and Metro Atlanta. Our technicians arrive equipped to handle repair, replacement, and installation on the same day you call.

Understanding Why These Leaks Occur

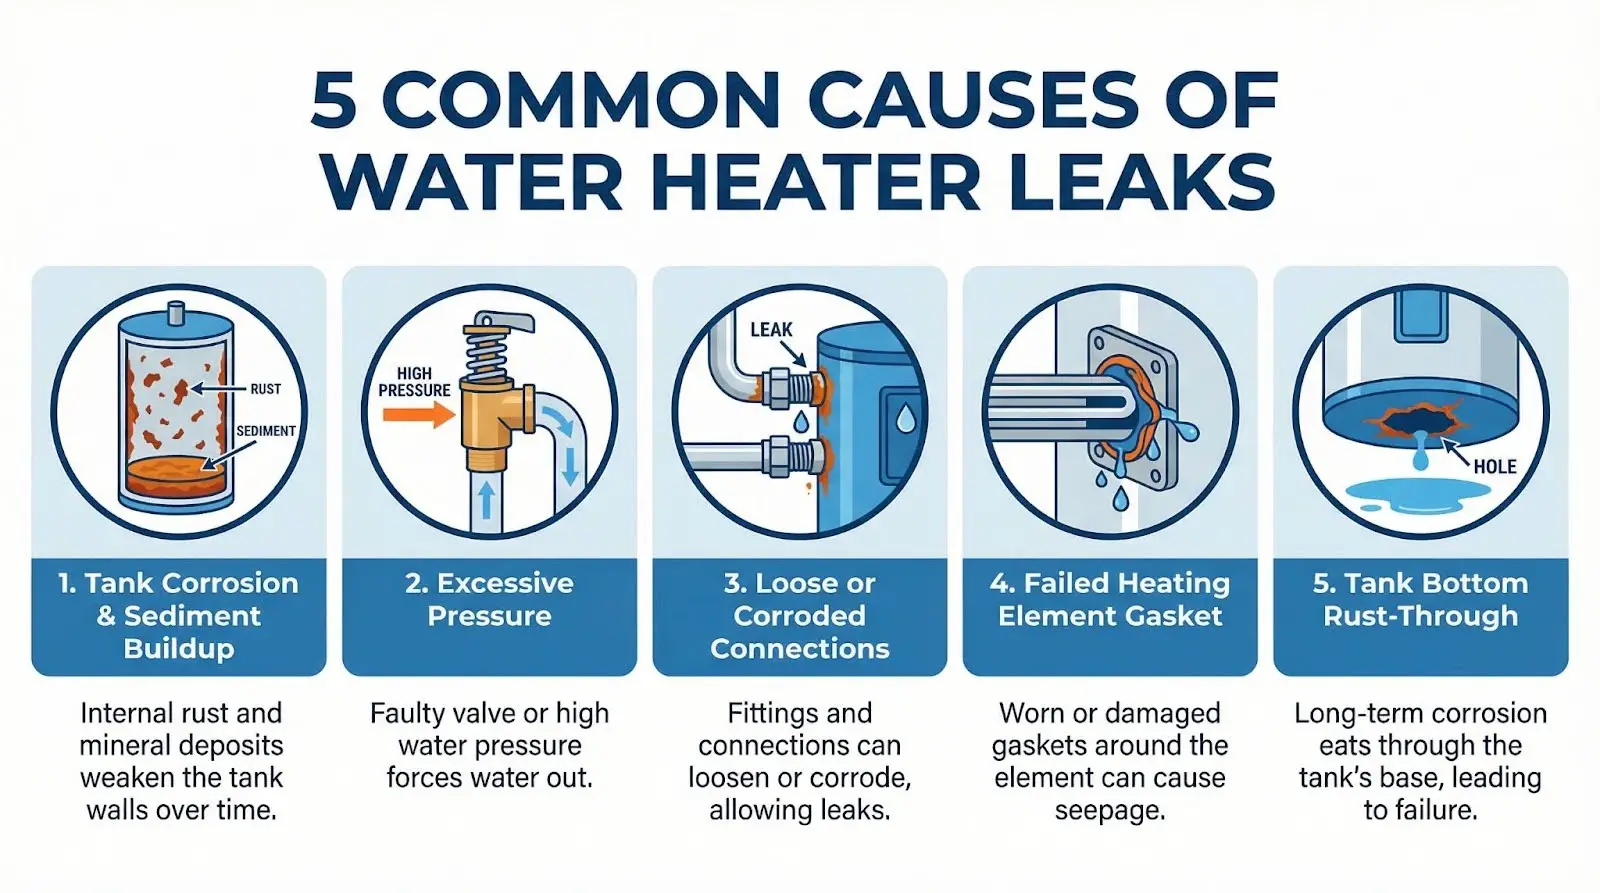
Knowing common causes of heater leaks helps homeowners recognize warning signs before emergencies develop. Regular maintenance and early intervention can prevent many catastrophic failures.

Age and corrosion: Most tank units last 8 to 12 years. Internal corrosion gradually weakens tank walls, eventually causing leaks. Sediment buildup accelerates this process by trapping heat against metal surfaces.

Excessive pressure: When the heating cycle creates too much pressure inside the tank, the pressure relief valve opens to release it. Continuous drainage from this valve indicates pressure problems or a failing valve.

Loose connections: Inlet and outlet pipes connect through threaded fittings. Thermal expansion and contraction can loosen these connections over time, creating slow drips that worsen without attention.

Failed heating elements: Electric units use elements that extend into the tank. Gasket failures around these elements allow moisture to escape.

Tank failure: Catastrophic leaks from the tank bottom usually mean the internal liner has corroded through. This damage requires complete replacement rather than repair.

Warning Signs Your Unit May Fail Soon

Homeowners who pay attention to early warning signs can often schedule service before emergencies occur. Watch for these indicators that your system needs professional attention.

Rusty or discolored hot water: Brown or rust-colored discharge from hot taps suggests internal corrosion. This problem typically worsens until leaks develop.

Rumbling or popping sounds: Sediment buildup at the tank bottom causes boiling beneath the layer, creating unusual noises during heating cycles.

Visible rust on tank exterior: External rust, especially around seams and connections, often precedes leaks. Check your tank regularly for corrosion.

Moisture or dampness nearby: Even small drips can indicate developing problems. Investigate any moisture around your unit promptly.

Inconsistent hot water temperature: Failing heating elements or thermostats may indicate broader system problems requiring professional assessment.

Age approaching 10 years: Units nearing the end of their expected lifespan deserve closer monitoring and consideration for proactive replacement.

Tankless vs Tank Units: Emergency Differences

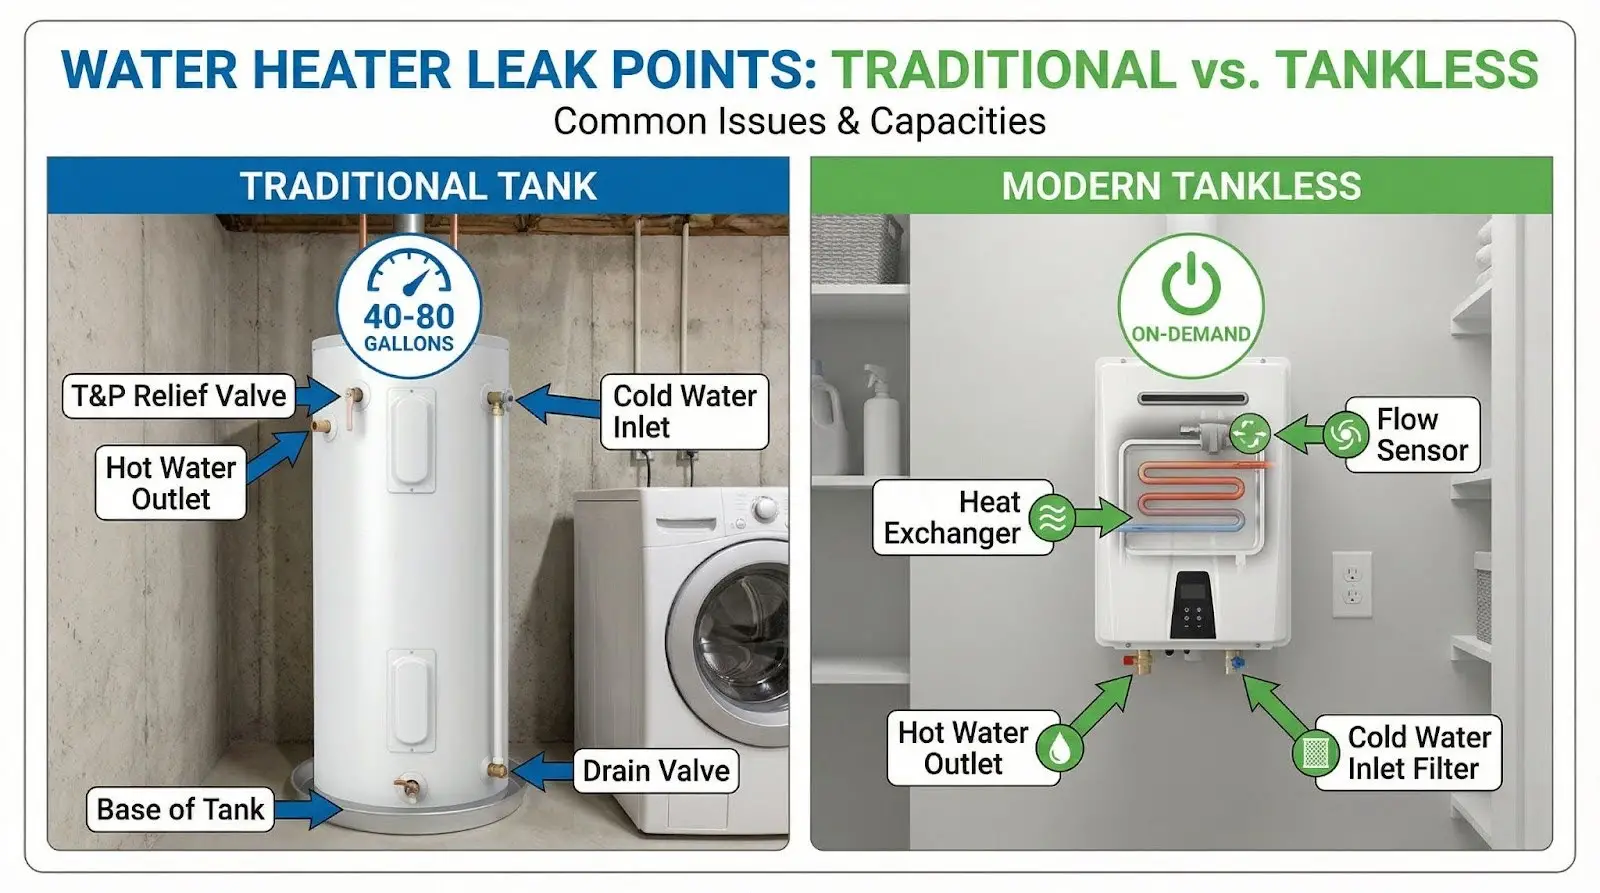
Your response to an emergency differs slightly depending on whether you have a traditional tank or tankless system. Understanding your setup helps you act appropriately.

Tank water heaters store 40 to 80 gallons of hot water continuously. Leaks from these units can release significant volumes quickly, making fast shut-off critical. The stored water inside these tanks means even after shutting off supply, significant drainage may continue.

Tankless water heaters heat on demand without storage tanks. While they can still develop leaks at connections or internal components, they typically cause less flooding because they do not hold standing volumes. However, connection failures can still cause substantial damage.

Both systems require professional attention when leaking. Never attempt to disassemble or address water heater components yourself, regardless of the type installed in your property.

Preventing Future Emergencies

Regular maintenance significantly reduces the risk of unexpected failures. Simple preventive measures protect your investment and your property while extending the lifespan of your water heaters.

Annual professional assessment: Have a licensed plumber evaluate your water heater annually. Technicians can identify corrosion, weak connections, and component wear before problems become emergencies.

Flush the tank yearly: Draining sediment extends lifespan and improves efficiency. K L Contractor Plumbing Inc performs this during routine maintenance visits. Sediment buildup is one of the leading causes of premature water heater failure.

Test the relief valve: Lift the valve lever briefly once per year to ensure it operates properly. Water should flow through the discharge pipe and stop when you release the lever. A malfunctioning valve can lead to dangerous pressure buildup, as explained by the U.S. Department of Energy’s water heater safety guidelines.

Check the anode rod: This sacrificial rod attracts corrosive elements that would otherwise attack your tank. Replacement every 3 to 5 years dramatically extends tank life. Many homeowners overlook this simple maintenance step.

Monitor water pressure: Excessively high water pressure stresses your entire plumbing system. Install a pressure regulator if readings exceed 80 PSI. High pressure accelerates wear on water heaters and other appliances.

Replace aging units proactively: Rather than waiting for failure, consider replacing water heaters approaching 10 years of age. Planned installation costs less than emergency replacement and prevents water damage to your home.

When Replacement Makes More Sense Than Repair

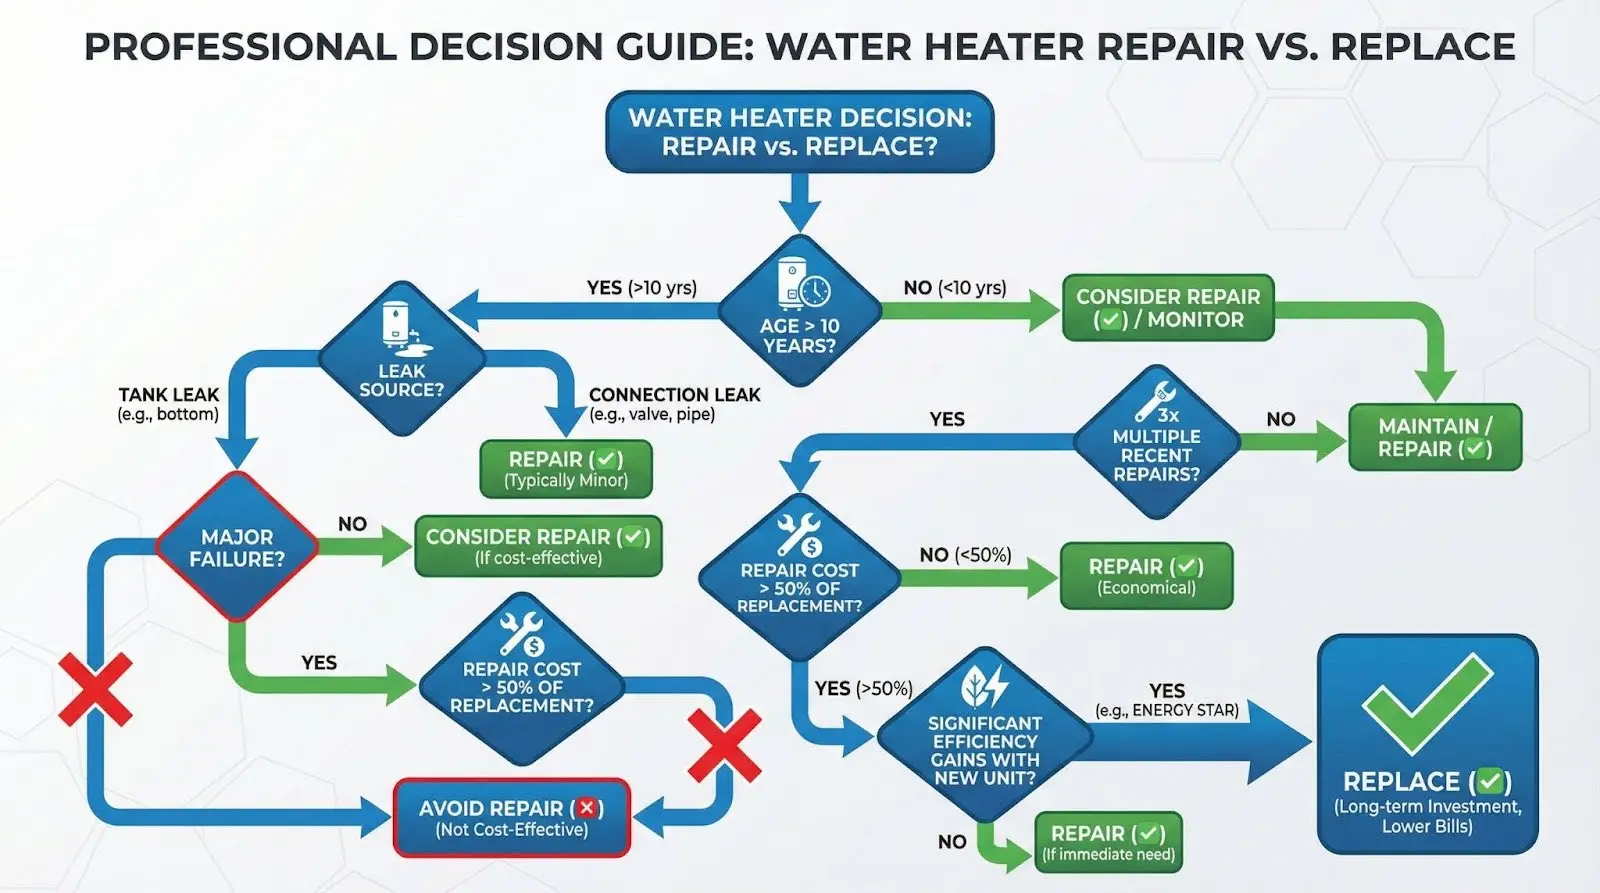
Not every heater leak justifies repair. Sometimes replacement provides better value and long-term protection for homeowners facing water heater problems.

Consider replacement when:

  • Your water heater is more than 10 years old
  • The tank itself is leaking rather than connections or valves
  • Repair costs approach 50% of replacement costs
  • You have experienced multiple repairs within recent years
  • Your current unit lacks energy efficiency features of modern water heaters
  • You want to upgrade capacity or switch to a tankless system

K L Contractor Plumbing Inc helps Marietta homeowners evaluate repair versus replacement options honestly. Our technicians provide clear recommendations based on your specific situation, never pushing unnecessary work.

Emergency Preparedness Checklist for Homeowners

Prepare now so you can respond effectively if a water heater emergency strikes your home. These simple preparations save precious minutes during actual emergencies.

Know your shut-off locations:

  • Label your water heater shut-off valve clearly
  • Mark the main water shut-off valve for easy identification
  • Identify the correct circuit breaker or gas valve
  • Ensure all family members know these locations

Keep emergency supplies accessible:

  • Store a working flashlight nearby
  • Keep towels or rags nearby for water absorption
  • Maintain a bucket or wet/dry vacuum in accessible storage
  • Save emergency contact numbers in your phone

Schedule regular maintenance:

  • Annual professional assessments catch problems early
  • Routine flushing prevents sediment buildup
  • Component checks ensure reliable operation

The Importance of Professional Emergency Response

While the steps above help you minimize damage during a water heater leak emergency, professional intervention remains essential. Licensed technicians bring expertise, proper tools, and code-compliant solutions that protect your home and family.

K L Contractor Plumbing Inc responds to emergency calls throughout Marietta, Kennesaw, Smyrna, Roswell, and surrounding Metro Atlanta communities. Our team handles everything from minor repairs to complete water heater installation, including both tank and tankless systems.

Our emergency response includes:

  • Rapid arrival by experienced, licensed technicians
  • Complete diagnostic assessment of your water heater
  • Clear explanation of options and recommendations
  • Same-day repair or installation when possible
  • Proper disposal of failed equipment
  • Warranty coverage on parts and labor

We understand that water heater failures never happen at convenient times. That is why K L Contractor Plumbing Inc offers 24/7 emergency plumbing services with no additional charges for after-hours calls.

Act Fast, Stay Safe, Call for Help

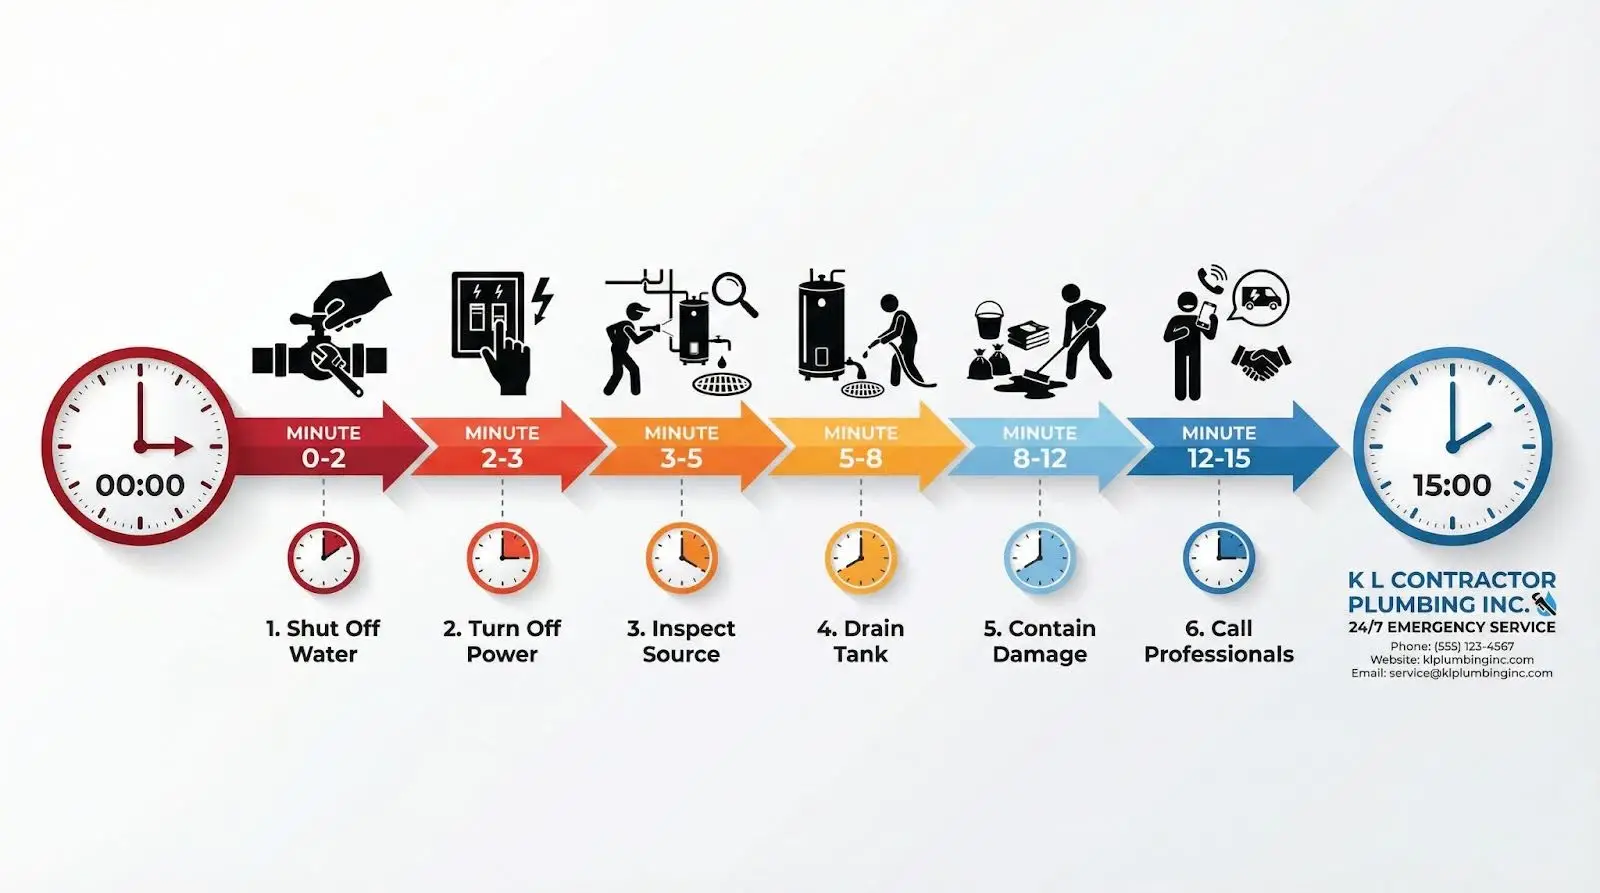
The first 15 minutes of a water heater leak emergency determine how much damage your home sustains. By following these steps, you protect your belongings while ensuring your safety.

Remember the sequence:

  1. Recognize emergency signs and act immediately
  2. Shut off the water supply to stop continued leaking
  3. Turn off power to eliminate safety hazards
  4. Assess and document the leak source
  5. Drain the tank if safely accessible
  6. Contain the spread and protect belongings
  7. Contact professional plumbing services for repair

A leaking water heater is a serious plumbing emergency that demands expert attention. Do not attempt repairs yourself or hope the problem resolves on its own.

K L Contractor Plumbing Inc stands ready to help Marietta homeowners facing water heater emergencies. Our experienced technicians provide fast, reliable service that restores hot water to your home safely.

Call K L Contractor Plumbing Inc at 404-637-2796 for immediate emergency water heater service. We respond quickly to protect your home and restore your comfort.

If you’re experiencing other plumbing issues alongside your water heater problems, we also provide comprehensive services including water line repair and home repiping for aging plumbing systems.

Frequently Asked Questions About Water Heater Leaks

How do I know if my water heater leak is an emergency?

Any active water flow from your tank or connections qualifies as an emergency. Standing water, spreading dampness, or water contacting electrical components requires immediate action.

Can I use my water heater if it is leaking?

No. You should shut off both water supply and power immediately. Operating a leaking water heater risks additional damage, electrical hazards, and potential flooding.

How long does emergency water heater repair take?

Many repairs can be completed within a few hours. However, if replacement is necessary, installation typically takes 3 to 5 hours depending on the system type and requirements.

Will my homeowners insurance cover water heater damage?

Many policies cover water damage from sudden appliance failures. Document all damage with photos and contact your insurance company promptly. Coverage varies by policy, so review your specific terms.

Should I replace my water heater after a major leak?

Tank leaks often indicate internal corrosion that will continue worsening. Water heaters over 10 years old or those with tank damage typically warrant replacement rather than repair.

What causes a water heater to burst?

Excessive internal pressure, advanced corrosion, sediment buildup, and age can all contribute to catastrophic tank failure. Regular maintenance and timely replacement prevent most burst tank incidents.